User’s Guide for e-Learning Platform
System Requirements:
Google
Earth
1) Google Earth Plugin required ( download link: http://www.google.com/earth/explore/products/plugin.html
)
2) Operation System: Microsoft Windows 2000, XP and
Microsoft Windows
Apple
Mac OS X 10.4 and higher (Intel and PowerPC)
3) Web Browser:
* Microsoft Windows (2000, XP, and
Google Chrome 1.0+
Internet Explorer 6+
Firefox 2.0+
* Apple Mac OS X 10.4 and higher (Intel and
PowerPC)
Safari 3.1+
Firefox 3.0+
Google
Map
1) Adobe Flash Player plugin required (Version
2) Operation System: Windows XP, 7,Mac OS X 10.x
Web Browser:
IE6.x~8.x、FireFox3.x、Safari4.x、Opera10.x、 Google Chrome 4.x
Description:
1)
Web link
for e-Learning Platform via Mixed Reality:
http://www.pcexpert.com.tw/VN2011_Internal%20Use/VN_Demo_2.html
Left click
on the weblink above in order to enter the “e-Learning via Mixed Reality” e-learning
platform. There are three districts and one Botanical & Zoological Garden
included in this platform-all of them located in Saigon (
2) Click on one of the red block areas highlighted on
the homepage as shown below to enter into our e-learning
platform. (see Fig.1)
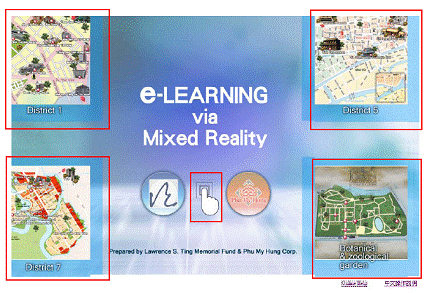
Fig.
1
3) Wherever you find any
one of the items as follows:
-Red Ball
-Blue Ball
-Star
-Blinking icon with“I”and/or“V”character
Moving the mouse cursor over
one of the items listed above will show a status bar near the cursor. You can then see the corresponding name and
information about the POI inside the box. See Fig.2 for details.
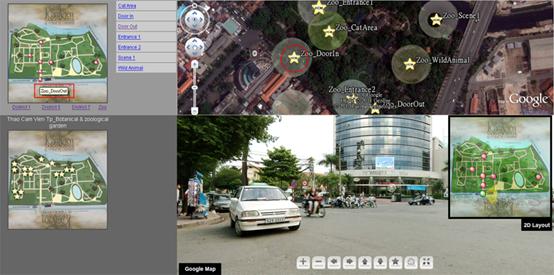
Fig.
2
4) Clicking on any one of
the items will activate the following functions:
- a panorama (540°
or 360°),
see Fig. 3 for details.
- a hot spot (close-up
image) with the statement of
the main features and/or milestones
- a video clip
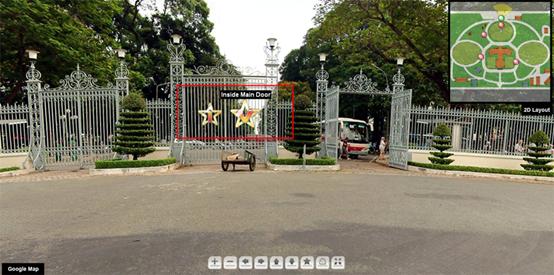
Fig. 3
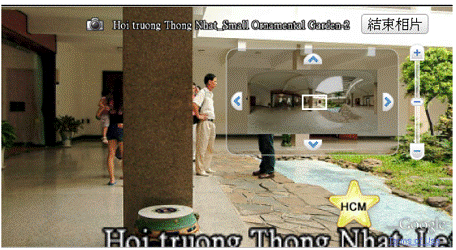
5) When you
activate a Panorama, then a toolbar will show up on the
Panorama (at the central bottom, see Figure 4 for details). Select
the "FullScreen" mode by
clicking on the button located at the right end of the toolbar for an
extended view.
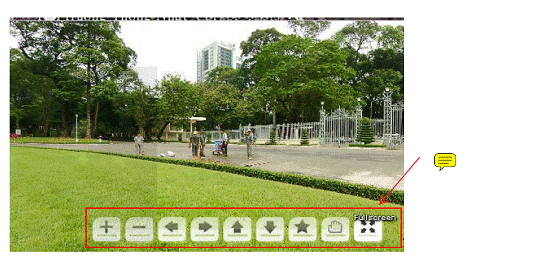
Fig.
4
Function
Buttons on toolbar:
1.
Zoom in button:
Click this button to zoom
in the panorama image.
2.
Zoom out button
Click this button to zoom
out the panorama image.
3.
Pan left button
Click this button to pan the
panorama image left.
4.
Pan right button
Click this button to pan the
panorama image right.
5.
Pan up button
Click this button to pan the
panorama image up.
6.
Pan down button
Click this button to pan the
panorama image down.
7.
Toggle quality button
Click this button to switch the
panorama quality if the panorama with multi-resolutions.
8.
Fullscreen button
Click this button to activate the
fullscreen mode.
6)
The panorama image contains both the Google Map (real-time GIS information) and
a 2D layout image which can be hidden or expanded by clicking on the related tab. The middle
button enables you to zoom in/out. To change the point to the
left, right, up and down use the left mouse button.
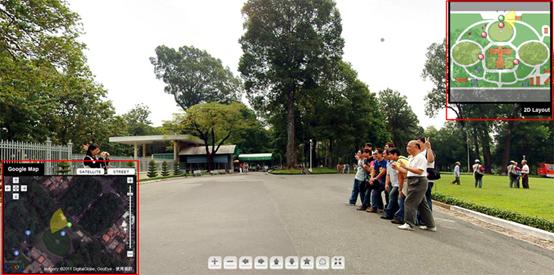
Fig.
5
7) On the top right-hand
corner in the web page is Google Earth (see
Fig. 6), The operation of the Google Earth is almost identical with Google Map except for
the following:
When you click
on any one of the "STAR" icons with HCM pattern over the interested POI
(Point of Interest), then an
information window will show up (see Fig. 7). You may either click the image inside
the information window directly or click on the text link below to activate a panorama
image (Regular Panorama) which is identical with Google Map.
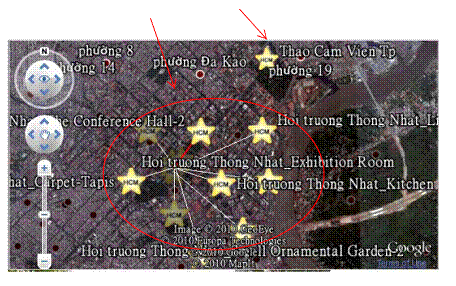
Fig.
6
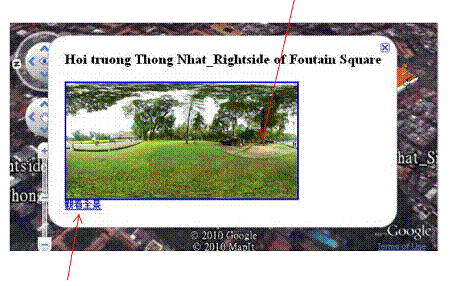
Fig.7
A
Google-Style Panorama window will appear when double clicking on any
one of the "STAR" icons. In certain cases it is difficult to
activate the Google-Style Panorama. In this case, just use the
middle button to scroll forward (zoom in). This will show some bubbles
(generated from its corresponding Panorama imagery) over
its POIs (see Fig.8). Double click on any one bubbles and the
Google-Style Panorama will show up (see Fig.9).
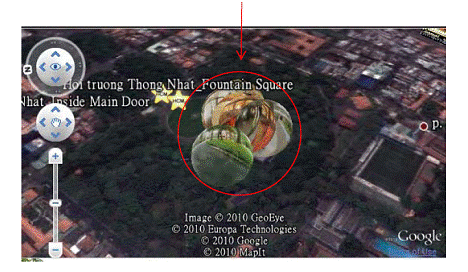
Fig.
8
Fig
9
8) The e-Learning Platform can also be integrated with
any VR, AR, MR development
tool
and/or authoring tool such as Flash for a variety of applications such as“Heritage
Preservation”,“Digital Archives”,“Marketing Event/Showcase”,
e-Catalogue/Book/Manual,“Simulation and Training”,“On-line Demo &
Presentation”
or
Virtual Museum/Mall… etc in real-time.
To
follow the directions outlined in item 7 it is necessary to first activate the
demo
program
(available soon) shown below. The
demo program will show the visitor how
to
integrate a VR application into the e-Learning Platform:
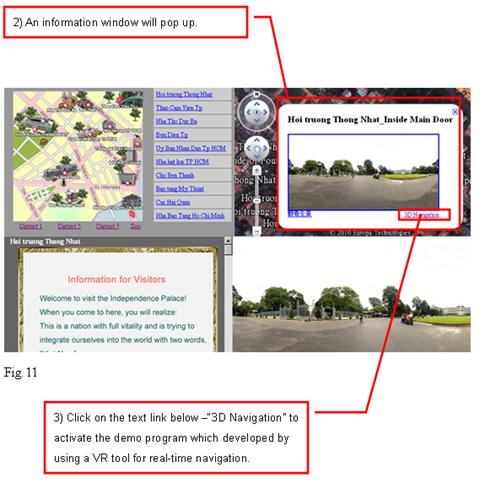
When
you click on any of the "STAR" icons with the HCM pattern over the Reunification
Palace, an information window will pop up (see Fig.10~11). You
may click on the
text
link
below –“3D Navigation” to activate the demo program which was developed by
using a
VR tool for real-time navigation.
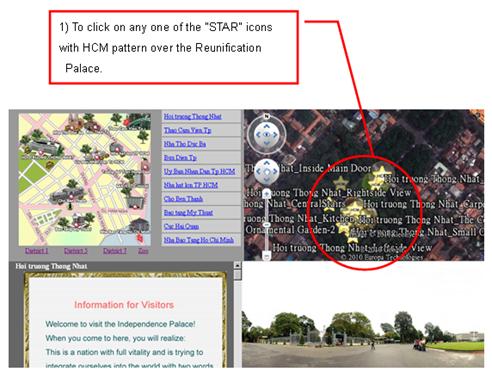
Fig.10
The virtual (graphic-based)
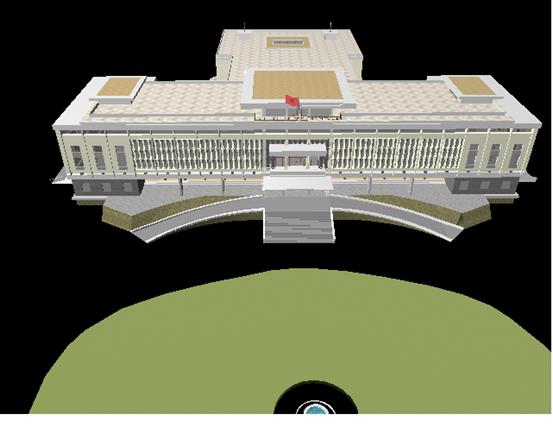
Fig.12